[ServiceMesh] 服务网格istio入门实践
2020年更新:由于 istio 1.5 发生了重大的架构改动,本篇小部分内容与当前最新版本不完全一致。istio目前仍然处于不太成熟的阶段,最近出现了一下eBPF模式的无代理ServiceMesh,也值得关注。
浅谈服务网格
服务网格即Service Mesh,istio是目前最主流的Service Mesh实现。笔者第一次了解istio是18年3月份,那时候istio 0.7刚发布,硬着头皮读完官方文档之后内心是崩溃的,这啥玩意?之后逐渐了解一些背景知识之后,才开始对istio以及服务网格有了一些浅显的理解。
服务网格的概念理解
首先,看下istio提供了什么:
- 服务间通信的基础设施层, 服务治理的终极解决方案
- 平台级别的服务发现,流量管理控制,以istio为例,它提供的能力包括:
- TCP/HTTP/HTTP2/gRPC 应用的服务发现、负载均衡
- 出入流量控制和路由、TLS/双向TLS、认证授权、黑白名单
- 灰度控制、限流、熔断
- 健康检查、故障注入、镜像流量
- 对应用无感知的监控、日志、链路追踪、动态服务拓扑图等等
罗列这些功能之后可能还是不好理解Service Mesh,理解一个抽象的概念最好的办法就是具象化。我们把微服务系统想象成一个巨大的工厂,生产出的产品就相当于微服务系统对外部提供的服务,每个微服务应用想象成工厂流水线上的一个个工人,那么如何保障这个复杂的流水线正常运行呢?从每个岗位上的工人的角度,有两种做法:
- 一种做法是把自己要做的事情做好,并且跟上下游的每个工人保持沟通,明确当前步骤完成后交给下游谁去继续处理(负载均衡),下游工人请假了怎么办(熔断降级)等等
- 另一种做法把自己要做的事情做好,其它的所有事情交给流水线管理员和"智能流水线"去处理,不需要直接跟上下游任何其它工人沟通
很显然,相比于第二种方法,第一种做法是低效的。第二种方法每个工人只需要专注于自己的工作,无须考虑任何其它事情,效率更高也更智能。istio就像这样的“智能流水线管理系统”,从接管流水线的出入口(流量)为切入点来治理整个生产链路,它不处理生产制造本身,但处理一切与生产制造无关的事务
我们回到软件工程领域,软件的复杂度是永恒的,没有银弹可以”降低复杂度“,只有将其分而治之。大到领域驱动设计,微服务架构,小到每个方法/函数的切分重构,都是这个道理。微服务化解决了很多问题同时也带来了另外的问题,Kubernetes通过抽象出Service提供服务发现和简单的负载均衡,Ingress提供API网关,解决了部分服务治理的问题。然而仅仅这些还不够,ServiceMesh就是一个完整的解决服务治理问题的思路,istio则是主流的实现之一。
istio 初探
istio通过每个服务配备一层代理(SideCar)来接管服务的出入口流量,以此来解耦业务逻辑和服务治理,不影响服务本身的业务。下面逐一介绍istio中的组件以及使用方法。
istio组件结构
一图胜千言,这张图摘自官方文档: https://istio.io/docs/concepts/what-is-istio 上半部分是数据平面,即代理服务出入流量的Envoy;下半部分是控制平面,包括一堆职责不同的组件,每个组件的功能和名字相对应,共同构成了Control Plane部分。
数据平面:
- Envoy:Envoy是一个成熟的C++编写的高性能流量代理组件,相对于Nginx更加灵活和完善,更适合在可伸缩的动态环境下使用。文档参考:https://www.envoyproxy.io/docs/envoy/latest/
控制平面:
- Pilot:翻译成“领航员”更合适,Pilot监视着服务的实例,给Envoy提供服务发现的能力(这层服务发现是建立在K8S Service之上的,并不等价于K8S的服务发现机制),并生成流量控制的配置,动态推送流量控制配置到Envoy上实现智能路由。
- Citadel:“堡垒”,顾名思义,Citadel管理着通信安全,将TLS证书管理起来并推送相应的配置给Envoy,Envoy使用这些配置来实现TLS/双向TLS的加载和终止,业务服务无需关心通信安全。
- Mixer:“混合器”,Mixer收集Envoy上的遥测信息,交给Adapter处理,并且兼具管理和实现限速,黑白名单等策略的功能。这些Adapter实现请求链路追踪信息的持久化,日志的收集,监控数据的收集等等。这个“混音器”的主要作用就是“混合”第三方组件,比如集成Prometheus,Jaeger,Fluentd等等,实现istio本身不具备的功能。
- Galley:可以翻译成“战舰”,目前作为配置校验的组件,根据官网介绍,这个组件的最终目标是将与底层平台相关的东西抽到这里,比如Kubernetes相关的配置获取。
在Kubernetes集群安装istio
istio的安装请参考官方文档,下载Release版本,把Yaml文件Apply到Kubernetes集群中即可。https://github.com/istio/istio/releases
# 下载解压后进入目录应用该Yaml
kubectl apply -f ./install/kubernetes/istio-demo.yaml

# 看一下istio-system的组件
kubectl get po -n istio-system
#NAME                                      READY   STATUS
#grafana-67c69bb567-hhlz6                  1/1     Running
#istio-citadel-78c9c8b75f-wkkcv            1/1     Running
#istio-cleanup-secrets-1.1.4-2skw8         0/1     Completed
#istio-cleanup-secrets-2rwf8               0/1     Completed
#istio-egressgateway-6df84c5bd4-ddrrc      1/1     Running
#istio-galley-65fc98ffd4-mmw54             1/1     Running
#istio-grafana-post-install-1.1.4-bqdj2    0/1     Completed
#istio-grafana-post-install-2c2q9          0/1     Completed
#istio-ingressgateway-78f9cbb78f-crtsh     1/1     Running
#istio-pilot-6b75486f59-vm4zm              2/2     Running
#istio-policy-784c66bc85-zqg4x             2/2     Running
#istio-security-post-install-1.1.4-s9r44   0/1     Completed
#istio-security-post-install-zlfcx         0/1     Completed
#istio-sidecar-injector-bf946798-llpql     1/1     Running
#istio-telemetry-8476d56f55-kc8lp          2/2     Running
#istio-tracing-5d8f57c8ff-9mmsj            1/1     Running
#kiali-d4d886dd7-hcj72                     1/1     Running
#prometheus-5554746896-hf9fh               1/1     Running
#servicegraph-5c4485945b-4hdw8             1/1     Running

# 还可以通过这条命令查看istio创建出来的CustomResourceDefinitions
kubectl get crd
# istio会创建数十个CRD,有一些核心的CRD下面会讲解

# 创建BookInfo示例项目
kubectl apply -f ./samples/bookinfo/platform/kube/bookinfo.yaml
# 在default Namespace下可以看到对应的Pod
# 每个Pod有一个应用服务容器和一个SideCar容器
kubectl get po可以看到,实际部署中还会有基于Envoy的IngressGateway,EgressGateway,另外有一些诸如istio-tracing(Jaeger)、以及可视化工具service-graph,Kiali等等。
注意:Kubernetes 1.9之后能够支持MutatingAdmissionWebhook,而istio-sidecar-injector会利用这个特性通过Webhook自动注入SideCar容器到Pod中,这个特性需要API Server启动参数添加:--admission-control=MutatingAdmissionWebhook, ValidatingAdmissionWebhook。笔者用的Minikube在本地实验,默认已经支持,无需额外配置。
具体内容参考:https://istio.io/docs/setup/kubernetes/install/kubernetes/
流量管理
流量管理是istio的核心功能,我们以示例项目BookInfo (https://istio.io/zh/docs/examples/bookinfo/),从最简单的请求路由开始,逐步了解Pilot与Envoy组合的黑科技。
基础路由配置
首先,我们要给BookInfo应用创建一个入口告诉IngressGateway,这个入口就是一个Gateway。Gateway是istio创建的众多Kubernetes CRD之一,一个Gateway资源,可以类比Nginx网关的server部分配置。
# bookinfo-gateway.yaml
apiVersion: networking.istio.io/v1alpha3
kind: Gateway
metadata:
  name: bookinfo-gateway
spec:
  selector:
    istio: ingressgateway
  servers:
  - port:
      number: 80
      name: http
      protocol: HTTP
    hosts:
- "*"有了Gateway之后,继续定义VirtualService,应用到IngressGateway的Envoy上。下面这个绑定了Gateway的虚拟服务相当于Nginx的location部分,upstream是//productpage:9080。
VirtualService 定义了一系列针对指定服务的流量路由规则。每个路由规则都针对特定协议的匹配规则。如果流量符合这些特征,就会根据规则发送到服务注册表中的目标服务(或者目标服务的子集或版本)
也就是说,VirtualService是流量发起方的控制,根据请求的host匹配到对应的VirtualService,再应用对应的策略。VirtualService可以定义的策略非常丰富,下面会逐一讲解。
# bookinfo-edge-service.yaml
apiVersion: networking.istio.io/v1alpha3
kind: VirtualService
metadata:
  name: bookinfo
spec:
  hosts:
  - "*"
  gateways:
  - bookinfo-gateway
  http:
  - match:
    - uri:
        exact: /productpage
    - uri:
        exact: /login
    - uri:
        exact: /logout
    - uri:
        prefix: /api/v1/products
    route:
    - destination:
        host: productpage
        port:
number: 9080"bookinfo"这个VirtualService定义了几个URL的目的地Destination,即productpage前端服务,productpage进而需要与后端reviews、details两个服务通信,而reviews又需要和ratings通信。
这时候,我们需要创建DestinationRule,一方面我们需要知道这些服务在K8S集群的真实域名是什么,即host;而另一方面这些后端服务可能是多版本并存的,又需要定义每个版本对应的负载均衡子集(Subset)的Label Selector。
# destination-rule-all.yaml
apiVersion: networking.istio.io/v1alpha3
kind: DestinationRule
metadata:
  name: productpage
spec:
  host: productpage
  subsets:
  - name: v1
    labels:
      version: v1
---
apiVersion: networking.istio.io/v1alpha3
kind: DestinationRule
metadata:
  name: reviews
spec:
  host: reviews
  subsets:
  - name: v1
    labels:
      version: v1
  - name: v2
    labels:
      version: v2
  - name: v3
    labels:
      version: v3
---

apiVersion: networking.istio.io/v1alpha3
kind: DestinationRule
metadata:
  name: ratings
spec:
  host: ratings
  subsets:
  - name: v1
    labels:
      version: v1
---
apiVersion: networking.istio.io/v1alpha3
kind: DestinationRule
metadata:
  name: details
spec:
  host: details
  subsets:
  - name: v1
    labels:
      version: v1
  - name: v2
    labels:
version: v2DestinationRule还有一些高级功能,比如TrafficPolicy,可以定义负载均衡算法,负载均衡池的健康检查规则,TLS配置,HTTP或TCP连接池的限制等等。
定义好DestinationRules之后,继续来定义所有服务的VirtualService了,这些VirtualService没有gateways,会有默认的gateways值"mesh",即对所有网格里SideCar的Envoy生效,而非IngressGateway生效)
# virtual-service-all-v1.yaml
apiVersion: networking.istio.io/v1alpha3
kind: VirtualService
metadata:
  name: productpage
spec:
  hosts:
  - productpage
  http:
  - route:
    - destination:
        host: productpage
        subset: v1
---
apiVersion: networking.istio.io/v1alpha3
kind: VirtualService
metadata:
  name: reviews
spec:
  hosts:
  - reviews
  http:
  - route:
    - destination:
        host: reviews
        subset: v1
---
apiVersion: networking.istio.io/v1alpha3
kind: VirtualService
metadata:
  name: ratings
spec:
  hosts:
  - ratings
  http:
  - route:
    - destination:
        host: ratings
        subset: v1
---
apiVersion: networking.istio.io/v1alpha3
kind: VirtualService
metadata:
  name: details
spec:
  hosts:
  - details
  http:
  - route:
    - destination:
        host: details
subset: v1至此,我们已经把BookInfo的子服务之间的路由和通信规则定义好了,命令以及输出如下:
kubectl apply -f bookinfo-gateway.yaml
#gateway.networking.istio.io/bookinfo-gateway created

kubectl apply -f bookinfo-edge-service.yaml
#virtualservice.networking.istio.io/bookinfo created

kubectl apply -f destination-rule-all.yaml
#destinationrule.networking.istio.io/productpage created
#destinationrule.networking.istio.io/reviews created
#destinationrule.networking.istio.io/ratings created
#destinationrule.networking.istio.io/details created

kubectl apply -f virtual-service-all-v1.yaml
#virtualservice.networking.istio.io/productpage created
#virtualservice.networking.istio.io/reviews created
#virtualservice.networking.istio.io/ratings created
#virtualservice.networking.istio.io/details created现在可以试着从浏览器访问**//<node-ip>:<NodePort>/productpage**即可看到BookInfo应用的页面,在此之前需要先找下IngressGateway的外部访问入口:
# Step1. 查看K8S集群物理机/虚拟机边缘节点的真实IP
minikube ip
# 非minikube环境通过Node信息找 External-IP
kubectl get no -o wide

# Step2. 找到IngressGateway的LoadBalancer定义
# 这里NodePort:http2 31380 就是对外暴露的服务端口
kubectl describe svc istio-ingressgateway -n istio-system
#Type:                     LoadBalancer
#IP:                       10.106.24.49
#Port:                     status-port  15020/TCP
#TargetPort:               15020/TCP
#NodePort:                 status-port  30047/TCP
#Endpoints:                172.17.0.38:15020

#Port:                     http2  80/TCP
#TargetPort:               80/TCP
#NodePort:                 http2  31380/TCP
#Endpoints:                172.17.0.38:80
# ... 此处省略一串输出除了BookInfo应用之外,IngressGateway上还有很多其它的端口,可以自行创建Gateway把istio-system的组件暴露出去,比如Kiali:
# 创建一个绑定到15029端口的Gateway,并路由到 Kiali Service对应的Endpoint上
# 注意访问外部访问端口不是15029,是相应的NodePort 30294
apiVersion: networking.istio.io/v1alpha3
kind: Gateway
metadata:
  name: kiali-gateway
  namespace: istio-system
spec:
  selector:
    istio: ingressgateway
  servers:
  - port:
      number: 15029
      name: http
      protocol: HTTP
    hosts:
    - "*"
---

apiVersion: networking.istio.io/v1alpha3
kind: VirtualService
metadata:
  namespace: istio-system
  name: kiali-service
spec:
  hosts:
  - "*"
  gateways:
  - kiali-gateway
  http:
  - route:
    - destination:
        host: kiali
        port:
number: 20001浏览器访问**//<node-ip>:30294/kiali**, 默认用户名密码都是admin,可以看到Kiali Dashboard,其中Service Graph的功能相当惊艳,能够实时监控整个微服务系统的流量,比1.0版本之前的/servicegraph页面强大很多。

另外,定义集群出口流量规则需要用到ServiceEntry,这也是非常重要的一个概念,但本文篇幅有限,EgressGateway以及出口流量控制相关功能暂不涉及。
超时、重试、灰度控制、熔断降级、故障注入
看到这里,估计大部分读者有和笔者第一次试用istio同样的感受,这玩意咋配个路由都这么麻烦,Nginx几行搞定的事情却整这么复杂!
这是因为我们用Yaml把服务网格的模型建好了,之后所有高级功能,只需要几行即可实现,与在Kubernetes集群中部署服务一样,先苦后甜。
超时和重试:Reviews服务的/newcatalog接口,最多允许10秒超时,如果请求发送失败重试3次,每次2秒超时(重试间隔自动指数级延迟,目前无法配置)
# Reviews服务的VirtualService配置部分
spec:
  http:
  - match:
    - uri:
        prefix: /newcatalog
    timeout: 10s
    retries:
      attempts: 3
perTryTimeout: 2s灰度控制: 对于HTTP Header end-user为jason的所有请求到V2,其它的请求 25%的流量到V2版本,75% 到V1。
# Reviews服务的VirtualService配置部分:
spec:
  http:
  - match:
    - headers:
        end-user:
          exact: jason
    route:
    - destination:
        host: reviews
        subset: v2
  # 上面的match都没有匹配之后的default配置
  - route:
    - destination:
        host: reviews
        subset: v2
      weight: 25
    - destination:
        host: reviews
        subset: v1
      weight: 75
# 注:在上面已经事先定义了DestinationRule,
# 并且Review-V2这个Deployment已经存在熔断降级:
- 至多允许到Reviews服务10个并发连接、每个连接至多20个并发请求、未处理完的请求总和不能超过100个,否则触发断路器
- 对于1秒连续出现3个错误的实例,移出负载均衡池3分钟
注:istio提供的断路器功能不涉及业务,业务逻辑仍要处理熔断后的503响应来返回降级的数据
# Reviews服务的DestinationRule配置部分
spec:
  host: reviews
  trafficPolicy:
    # 连接限制策略
    connectionPool:
      tcp:
        maxConnections: 10
      http:
        http1MaxPendingRequests: 100
        maxRequestsPerConnection: 20
    # 负载均衡池检查策略
    outlierDetection:
      consecutiveErrors: 3
      interval: 1s
      baseEjectionTime: 3m
maxEjectionPercent: 100故障注入:对于Reviews服务,20%的请求使用400错误直接返回;10%的概率注入5秒延迟;
# Reviews服务对应的VirtualService部分配置
spec:
  http:
  - fault:
      abort:
        percent: 20
        httpStatus: 400
      delay:
        percent: 10
fixedDelay: 5s另外还有请求数据重写,重定向、镜像流量等功能,可参考文档配置: https://istio.io/zh/docs/reference/config/istio.networking.v1alpha3/#httproute
Mixer的超能力:监控、日志、链路追踪
监控
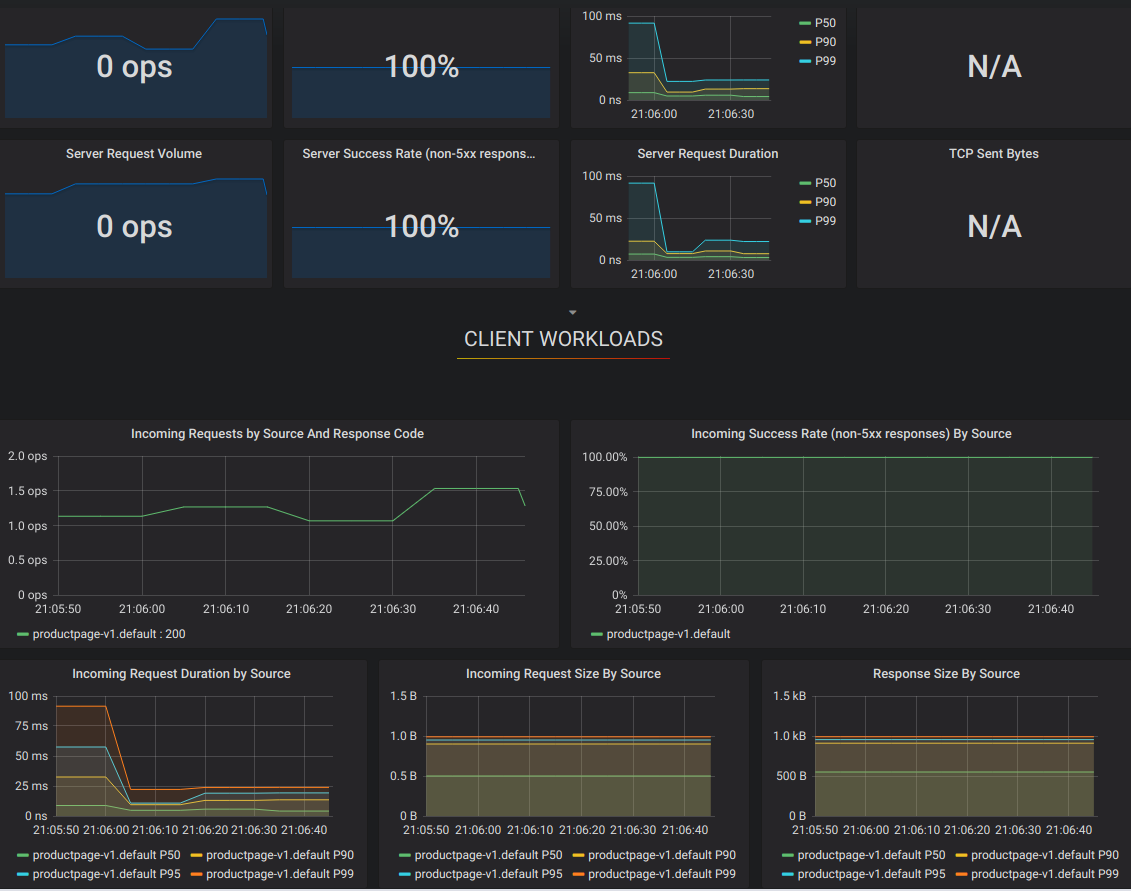
按照Demo装好之后,打开Prometheus的/config和/target页面,竟然已经有了很多监控配置,打开Grafana能看到很多漂亮的监控图表,那么这些监控数据是哪里来的呢?

这需要从Mixer的原理说起,Mixer从Envoy的流量中提取属性,生成Instance,然后把它交给handler,而Rule就是告诉Mixer需要把哪个Instance发给哪个Handler。
# 查看一下默认定义了哪些Rule
kubectl get rule -n istio-system
# 以promhttp这个Rule为例
kubectl get rule promhttp -o yaml -n istio-system当请求符合Match的条件时,把requestcount等metric的实例发送给Prometheus Handler。
kind: rule
metadata:
  name: promhttp
  namespace: istio-system
spec:
  actions:
  - handler: prometheus
    instances:
    - requestcount.metric
    - requestduration.metric
    - requestsize.metric
    - responsesize.metric
  match: (context.protocol == "http" || context.protocol == "grpc") && (match((request.useragent
| "-"), "kube-probe*") == false)继续查看metric,发现requestcount.metric这个Instance就是把请求的属性抽出来,value设置为1。
# kubectl get metric requestcount -n istio-system -o yaml
kind: metric
metadata:
  name: requestcount
  namespace: istio-system
spec:
  dimensions:
    connection_security_policy: conditional((context.reporter.kind | "inbound") ==
      "outbound", "unknown", conditional(connection.mtls | false, "mutual_tls", "none"))
    destination_app: destination.labels["app"] | "unknown"
    # 后面省略...
value: "1"进一步查看Handler,发现这个instance被发送到了一个叫prometheus的compiledAdapter。Prometheus Server通过事先配置好的Job,通过服务发现找到Mixer组件的/metrics接口刮取监控数据。
# kubectl get handler prometheus -o yaml -n istio-system
kind: handler
spec:
  compiledAdapter: prometheus
  params:
    metrics:
    - instance_name: requestcount.metric.istio-system
      kind: COUNTER
# 后面省略...日志
日志的原理也是一样的,Rule,Instance,Handler三步走。
# logentry Instance配置,定义日志提取模板
apiVersion: "config.istio.io/v1alpha2"
kind: logentry
metadata:
  name: newlog
  namespace: istio-system
spec:
  severity: '"info"'
  timestamp: request.time
  variables:
    source: source.labels["app"] | source.workload.name | "unknown"
    user: source.user | "unknown"
    destination: destination.labels["app"] | destination.workload.name | "unknown"
    responseCode: response.code | 0
    responseSize: response.size | 0
    latency: response.duration | "0ms"
  monitored_resource_type: '"UNSPECIFIED"'
---

# Fluentd handler 配置
apiVersion: "config.istio.io/v1alpha2"
kind: fluentd
metadata:
  name: handler
  namespace: istio-system
spec:
  address: "fluentd-es.logging:24224"
---

# 定义Rule,所有请求提取newlog Instance发送给fluentd Handler
apiVersion: "config.istio.io/v1alpha2"
kind: rule
metadata:
  name: newlogtofluentd
  namespace: istio-system
spec:
  match: "true"
  actions:
   - handler: handler.fluentd
     instances:
     - newlog.logentry
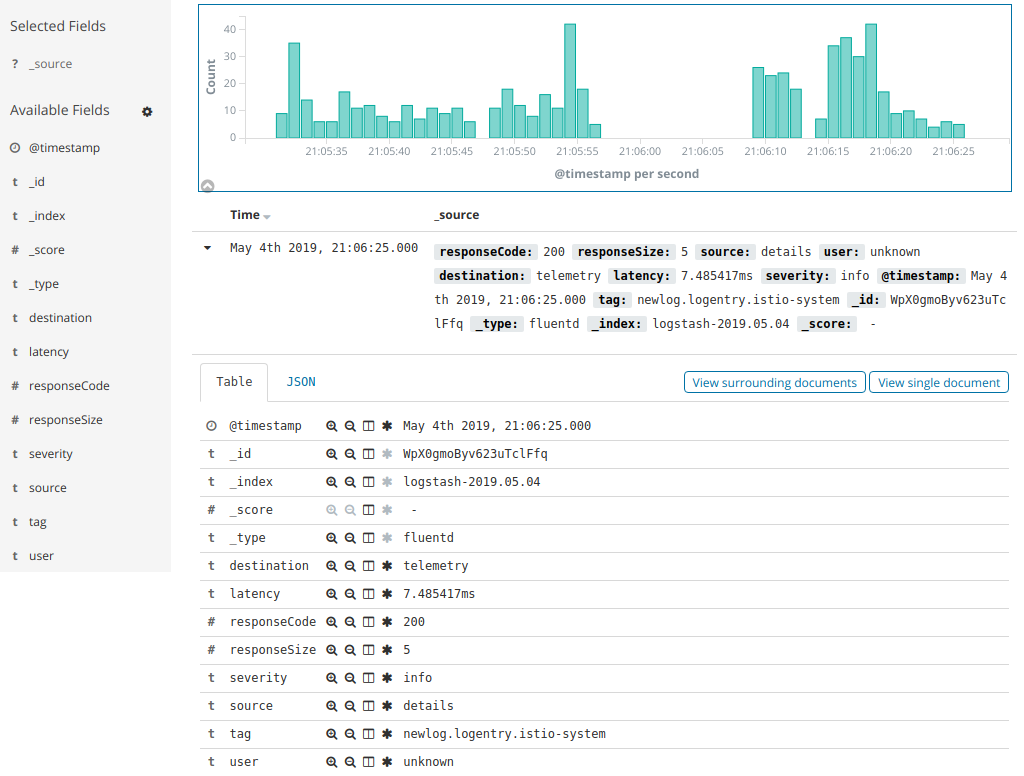
---Apply到集群之后,在ElasticSearch相应的Kibana上,就可以查询到所有请求的日志了。

分布式链路追踪
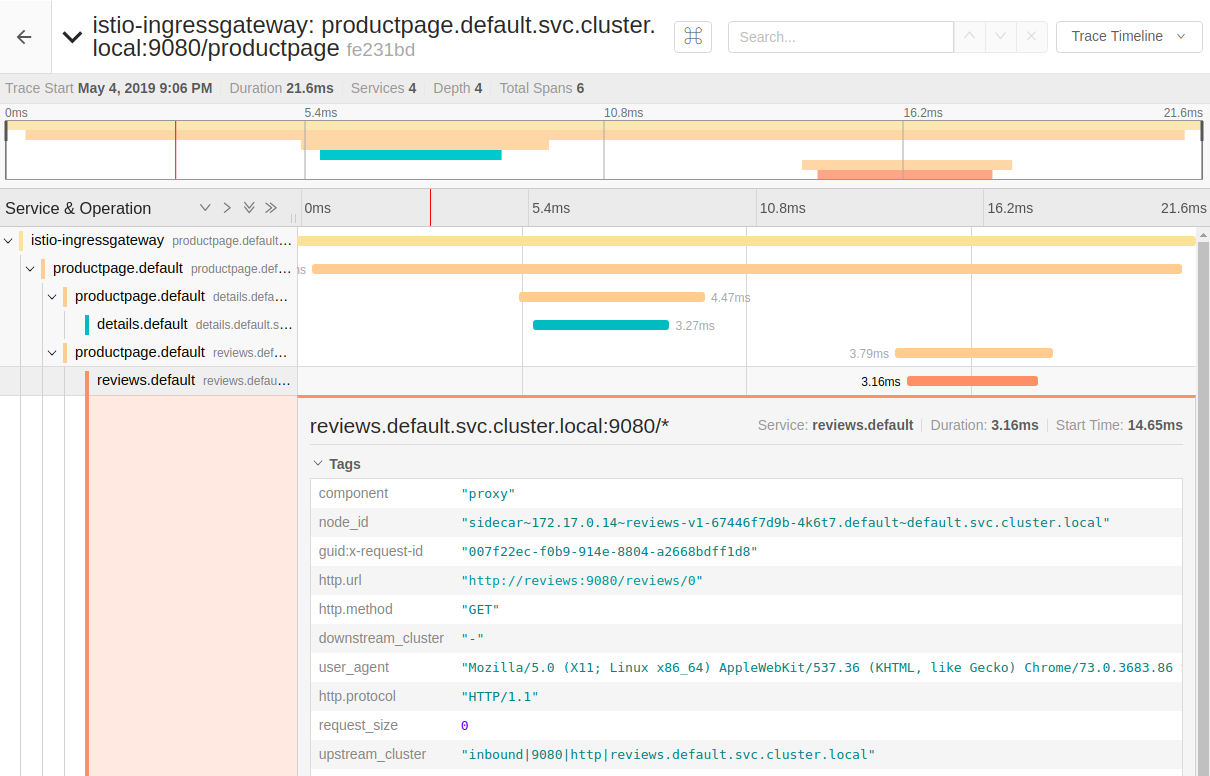
默认配置下istio会追踪所有请求,可以通过修改Pilot的环境变量PILOT_TRACE_SAMPLING来降低采样率。BookInfo示例应用直接访问即可在Jaeger中查询到全链路信息。

其他功能
除了这些,Mixer还有策略检查的功能,可以实现对不同用户请求限速,黑白名单等功能。这些功能的原理都是相同的,根据Rule和请求生成Instance给Handler处理。
通信安全
istio另一个亮点就是通信安全,主要有这几块,笔者还没学完,此处不在展开:
- TLS/mTLS: SideCar代理可以轻易实现TLS/双向TLS的Loading和Off-Loading,让网格间的通信没有明文
- RBAC : 基于角色的访问控制。istio定义了两个CRD: ServiceRole 和 ServiceRoleBinding,解决了同一个集群中如何控制A应该访问B,但不应该访问C的问题
- 认证授权: 另一个CRD:Policy,提供请求流量在到达业务层之前就做好认证授权的能力,比如OAuth的集成和JWT认证。
文档链接:https://istio.io/docs/tasks/security/
总结与思考
istio与Kubernetes
istio虽然并不依赖Kubernetes,也可以在裸机上结合Consul实现服务治理能力,但是实际使用中,istio + Kubernetes 显然是一个最优解。因为istio的思路和Kubernetes很像,定义一系列抽象概念来脱离底层实现,把这些概念当做可以增删改查的资源声明式地管理,比如常用的几种:
- Gateway 定义了入口路由规则
- VirtualService 定义了请求处理策略
- DestinationRule 定义了目标负载均衡池的行为
- ServiceEntry 定义与外部服务的通信规则
在Kubernetes中,这些istio的配置元数据寄存于Etcd集群,使得istio的关键组件得以无状态化。另一方面,这些CustomResourceDefinition的资源又可以借助Kubernetes API Server的能力对外提供一致的管理接口。只是浅显地了解这些顶级开源项目,就收获颇多了,真的很佩服这些业界大佬们。
istio与Spring Cloud
在istio出现之前,Spring Cloud作为微服务领域的先行者,以丰富的生态已经占据了不小的市场,而ServiceMesh的兴起有点像对Spring Cloud的降维打击。传统的Spring Cloud实现服务治理的主流玩法是这样的:
- Eureka / Consul 实现服务注册和发现
- Zuul / Spring Cloud Gateway 等组件控制流量入口
- Ribbon / Feign 实现服务端/客户端的负载均衡
- Sleuth + Zipkin 实现分布式链路追踪
- Hystrix + Turbine 实现熔断降级以及相关监控
- Spring Boot Actuator + Spring Boot Admin 实现应用性能监控
抛开整套解决方案的复杂度和学习成本,除了网关这一层对应用完全透明,其它的组件全部都是需要在业务组件上添加依赖、配置、注解的,导致每个应用服务叠Jar包叠的像一个千层饼,成也AOP,败也AOP。
这就像是在一张写了字的纸上,在上面划线必然影响纸上原有的内容,SpringCloud试图通过依赖注入避开业务去"划线"(服务治理),但这种做法局限在"纸"这个二维平面上,而Service Mesh则像是在三维空间上,用垂直与整个纸面的Z轴线,贯穿整张纸, 却只会留下一个点,不会影响纸上写的任何内容。就好比二维空间找不到垂直于两条非平行线的第三条线,而在三维空间就可以轻易找到这样的线。这就是Service Mesh正交地服务治理,从独立于业务的部署架构和运维配置的维度来思考服务治理,这也是istio与Spring Cloud的本质区别,因此说istio对Spring Cloud是一个"降维打击"。
异构 vs 同构
从某种意义上说,istio是一个异构微服务治理平台,相比之下,Spring Cloud更像是一个同构的微服务框架。因为istio不关心业务服务到底用的是什么技术,而Spring Cloud虽然支持其它语言,但只有全链路使用Spring生态的组件效果才能最大化。同构与异构没有谁比谁更好,取决于业务场景,不过个人认为,在开发团队的个人能力足够的情况下,选择异构化的技术栈,对团队成长,业务创新,迭代速度都很有利。
- 同构系统的学习成本相对更低,因为开发团队都用相似的技术栈
- 异构更加灵活,根据不同的业务选择最合适的语言和技术框架
- 人力成本,同构系统大部分情况下比异构系统更低,但某些场景下,选择更合适的技术会成倍降低人力成本
- 后期维护,一般同构系统也会比异构系统更容易,人员更迭交接相对简单
ServiceMesh的前景
Service Mesh是一个很新的理念,其主流实现istio是通过自动注入SideCar和一系列外部组件实现对业务完全透明的服务治理,思路非常新颖,但目前这个技术还不够成熟,也有关于性能和复杂度方面的质疑的声音。在2018年CNCF的年度调查中,大部分企业只是对它保持关注,愿意小范围尝试,很少有企业大规模使用在生产环境中。所有技术都有一个成熟度模型,就像军事上常说的”装备一代,设计一代,预研一代“,笔者个人非常看好Service Mesh的前景,即使目前还达不到“装备一代”的成熟度,但就像Kubernetes发展了几年后,在2018年迎来了爆发一样,相信Service Mesh是未来的趋势,将会逐渐发展成行业标准。
